

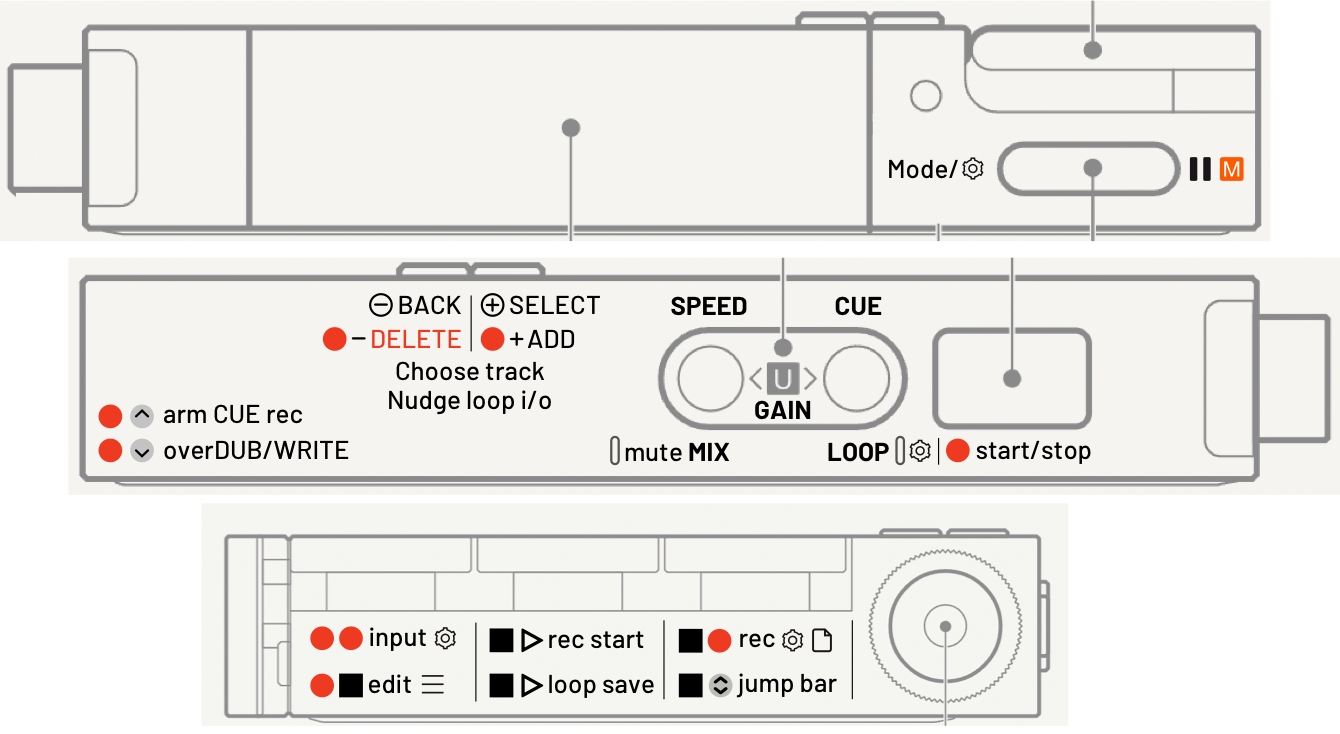
The UI of the TP-7 has been harder to internalize than other TE products, probably because there are fewer hardware buttons and more menu diving, which means more abstractness to hold in your head.
Decided on a different approach (these might also work as stickers, which I may make if there's enough interest) to get a clearer mental model. Sort of a TP-7 cheat sheet on the unit itself.
File types and elements
- Memo
- for voice recordings
- can't be multitrack but allows loops/cues
- Recording
- for multitrack recordings with loops and cues
- tracks can be recorded one by one or simultaneously from multiple inputs
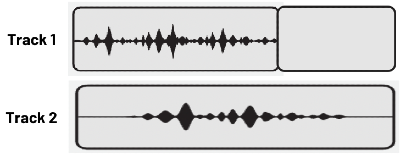
- tracks can be bounced (combined) into one track
- Library
- external high resolution audio files to listen to
- other non-audio file types possible
- uneditable, but allows loops and cues
- can be multitrack, if the loaded file is multitrack
- Loop
- a section of a recording, divisible by bar, can be nudged back and forth along the recording
- accessible and loadable from within the loop menu
- one loop can be saved per recording
- Cues
- fixed positions in a recording which let you quickly start playback from any of these points
Menus, settings and config screens
- ⚙️ SETTINGS: hold 🎚️MODE
- 🎙️RECORD settings is a submenu with a shortcut: [ hold ◼️ then 🔴 ]
- Metronome volume
- BPM
- Count in on/off
- Auto start record when sound crosses threshold/also stop record when sound stops (press (+)(-) to choose)
- ⬇️ INPUT source press 🔴 🔴
- auto: automatically select source and number of tracks depending on what is connected (won't give you options)
- digital: 1-3 digital stereo tracks from a USB host
- manual: set up analog and digital inputs in any combination, based on what you have plugged in (line/USB/mic/off)
- ✏️ EDIT MODE: hold 🔴 then ◼️
- this is its own world, where buttons behave differently from
non-edit mode (hold 🔴 then ◼️ again to exit) - use the reel to choose things
- this is its own world, where buttons behave differently from
- MIX or LOOP settings: tap 🎚️MODE when using them
Let's try multitrack recording
- Check your 🎙️RECORD settings by using the shortcut [hold ◼️, press 🔴 repeatedly)
- Arm the recording by pressing 🔴 (or start recording from a selected cue with 🔴 (<))
- check GAIN with (<) (>)
- check ⬇️ INPUT source by pressing 🔴 again
- you may also need to go into ⚙️Settings by holding 🎚️MODE to change your:
- jacks configuration (line in, headset mic, outputs)
- source configuration
- thru configuration (if you can't hear anything)
- 🎙️ Record by pressing ▶️ , stop with ◼️
- Enter ✏️ EDIT MODE by holding 🔴 then ◼️
- Add a new track by holding 🔴 and pressing (+)
- Choose the track you want to record to next with (+) and (-)

- Jump to the start of the recording with ◼️ then ▶️
- Choose overDUB or overWrite with 🔴 and (>)
- 🎙️ Record into the new track by pressing ▶️ , stop with ◼️.
... repeat for all tracks.
- Done? You can name your recording via FILE in ⚙️Settings.
Bonus!
Someone made a TP-7 utility (MacOS) for working with multitrack recordings.
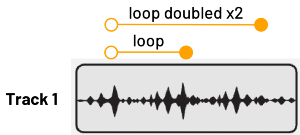
Loops
Loops are sections of a recording defined by IN and OUT points.
- Define the space between IN and OUT loop points by holding 🔴 and letting go to stop.
- Retrigger loop from the start with ▶️
- Access LOOP SETTINGS by pressing 🎚️mode, and use (+) (-) to nudge/choose:
- divider: divides or extends the loop into a shorter or longer time in fixed intervals relative to its own length. (A 2 sec loop x2 will be a 4 sec loop.)
- loop move: (move one loop length forward or back. For finer control, use a smaller divider)
- IN point
- OUT point
Note: Nudging the in/out points with (+)(-) is very subtle/tiny, so it might not sound like anything is happening, but it is indeed moving. Just keep tapping.
From obscurahail on Reddit: Try pressing play, then scrubbing the wheel back over the loop end/beginning as you adjust the 'in' or 'out'. You will notice it shifts very slightly.
I sometimes try scrubbing to the peak of a kick while playing, hold it precisely on the peak, then hold REC, release the wheel and let it play till just before I want the loop to end. Then I hold the wheel again and scrub forward to precisely the kick's peak again.
Cues
Cues are bookmarks in your sound that you want to be able to recall quickly.
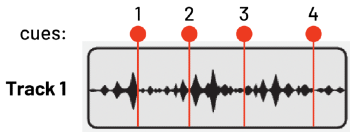
- Add your first cue by holding 🔴 and then pressing (+). REMOVE with (-).
- The cue will be added to wherever the track is currently stopped, so if you want it at the very start, move the track to the starting point first with ◼️ ▶️ .
- You can also add cues while the track is playing.
- Remove all cues by holding 🔴 and (-). A confirmation screen will appear.
- Select an existing cue mark with (+)(-).
- Set the position of this chosen cue by moving the audio to where you want it, and then pressing 🔴.
- Start playing from the start of the selected cue by pressing ▶️
- If you're "off" a cue, press ◼️ when stopped to jump to the start of that cue section.
- Arm recording from the selected cue with 🔴 (<)
- If MIDI cue is enabled, hold 🔴 and then play 🎹 MIDI notes to set different cues.
- play these notes back to trigger the associated cues (A on your keyboard triggers cue 2, F# triggers cue 3, and so on)
Things to note:
- If you hold ◼️ and press 🔴 , you open 🎙️Record settings, but to go from one setting to another you press 🔴 again (while holding ◼️) instead of rotating the wheel as you do in, say, the ⚙️Settings menu.
- (Note: this is a shortcut alternative to navigating to 🎙️Record settings in the ⚙️Settings menu.)
- Apparently the U in the middle of the (< >) gain/loop/cue/mix/speed buttons stands for "User buttons". I don't get how the functions of those buttons relate to the user in particular though.
- You can't trim recordings/samples the way you can in the EP-133 and OP-1. Track length can expand with the longest track but it cannot shrink. Think of recordings more like the tape in the OP-1 instead of individual sample recordings.
- You can't go to the start of the loop in LOOP mode by tapping ◼️ and ▶️ the way you can in record mode. That key combo saves or loads loops (which can sometimes be confusing)
- You can jump through a recording by bar by holding ◼️ and pressing (<)(>) Bar length is determined by the tempo set before recording.
- Recordings can each have only one loop, and you can't browse loops.
Question:
- ⭕️ Is there a difference between recording in edit mode vs out of it?
Thoughts:
- Would like to switch directly between Loop and Speed for live performance purposes. Currently if you're in speed and you press (>) to go to loop, you're first in some neutral state (track numbers plus a circular arrow icon) and if you make the mistake of starting to press buttons like you're in Loop, you can lose your loop entirely and have to reload it.
- Would love to be able "trim all sound before/after cue x"
- Might want to save a loop as a new recording, thereby having another way to trim audio
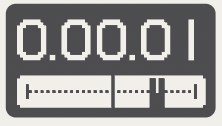
- Would love a more precise way to define in/out loop points, cues, etc. Currently it's hard to identify where I am by the rotation amount of the last number.
- Maybe "in" could keep looping a really short part of the start of the loop over and over so you can hear better where you are as you move it, as is the case on the EP-133 (TBH I'm not sure if it moves as I press (-) (+) while it's playing, or only when it's stopped)
- Since the reel moves the sound forward in fixed tiny increments, maybe there could be a row of dots under the number but above the file name that appear/disappear as the last number moves, (or a vertical row of dots all the way on the right with halfway point larger dots) which would reset to zero at each full decimal place.
Alternatively, show the track position another way (maybe a ruler with section numbers, something like the bottom of the Varispeed screen.
Did you find the post useful?
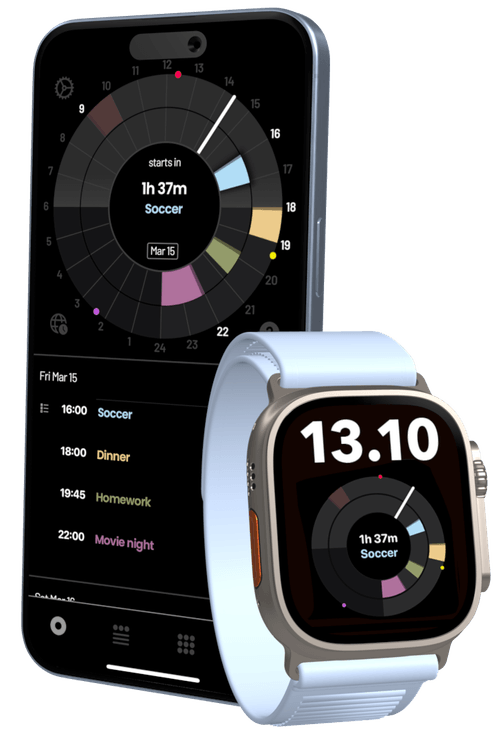
I made a calendar app for ADHD which shows each day as a 24h dial.
Word of mouth is the lifeblood of an indie developer, so you can also do this: