

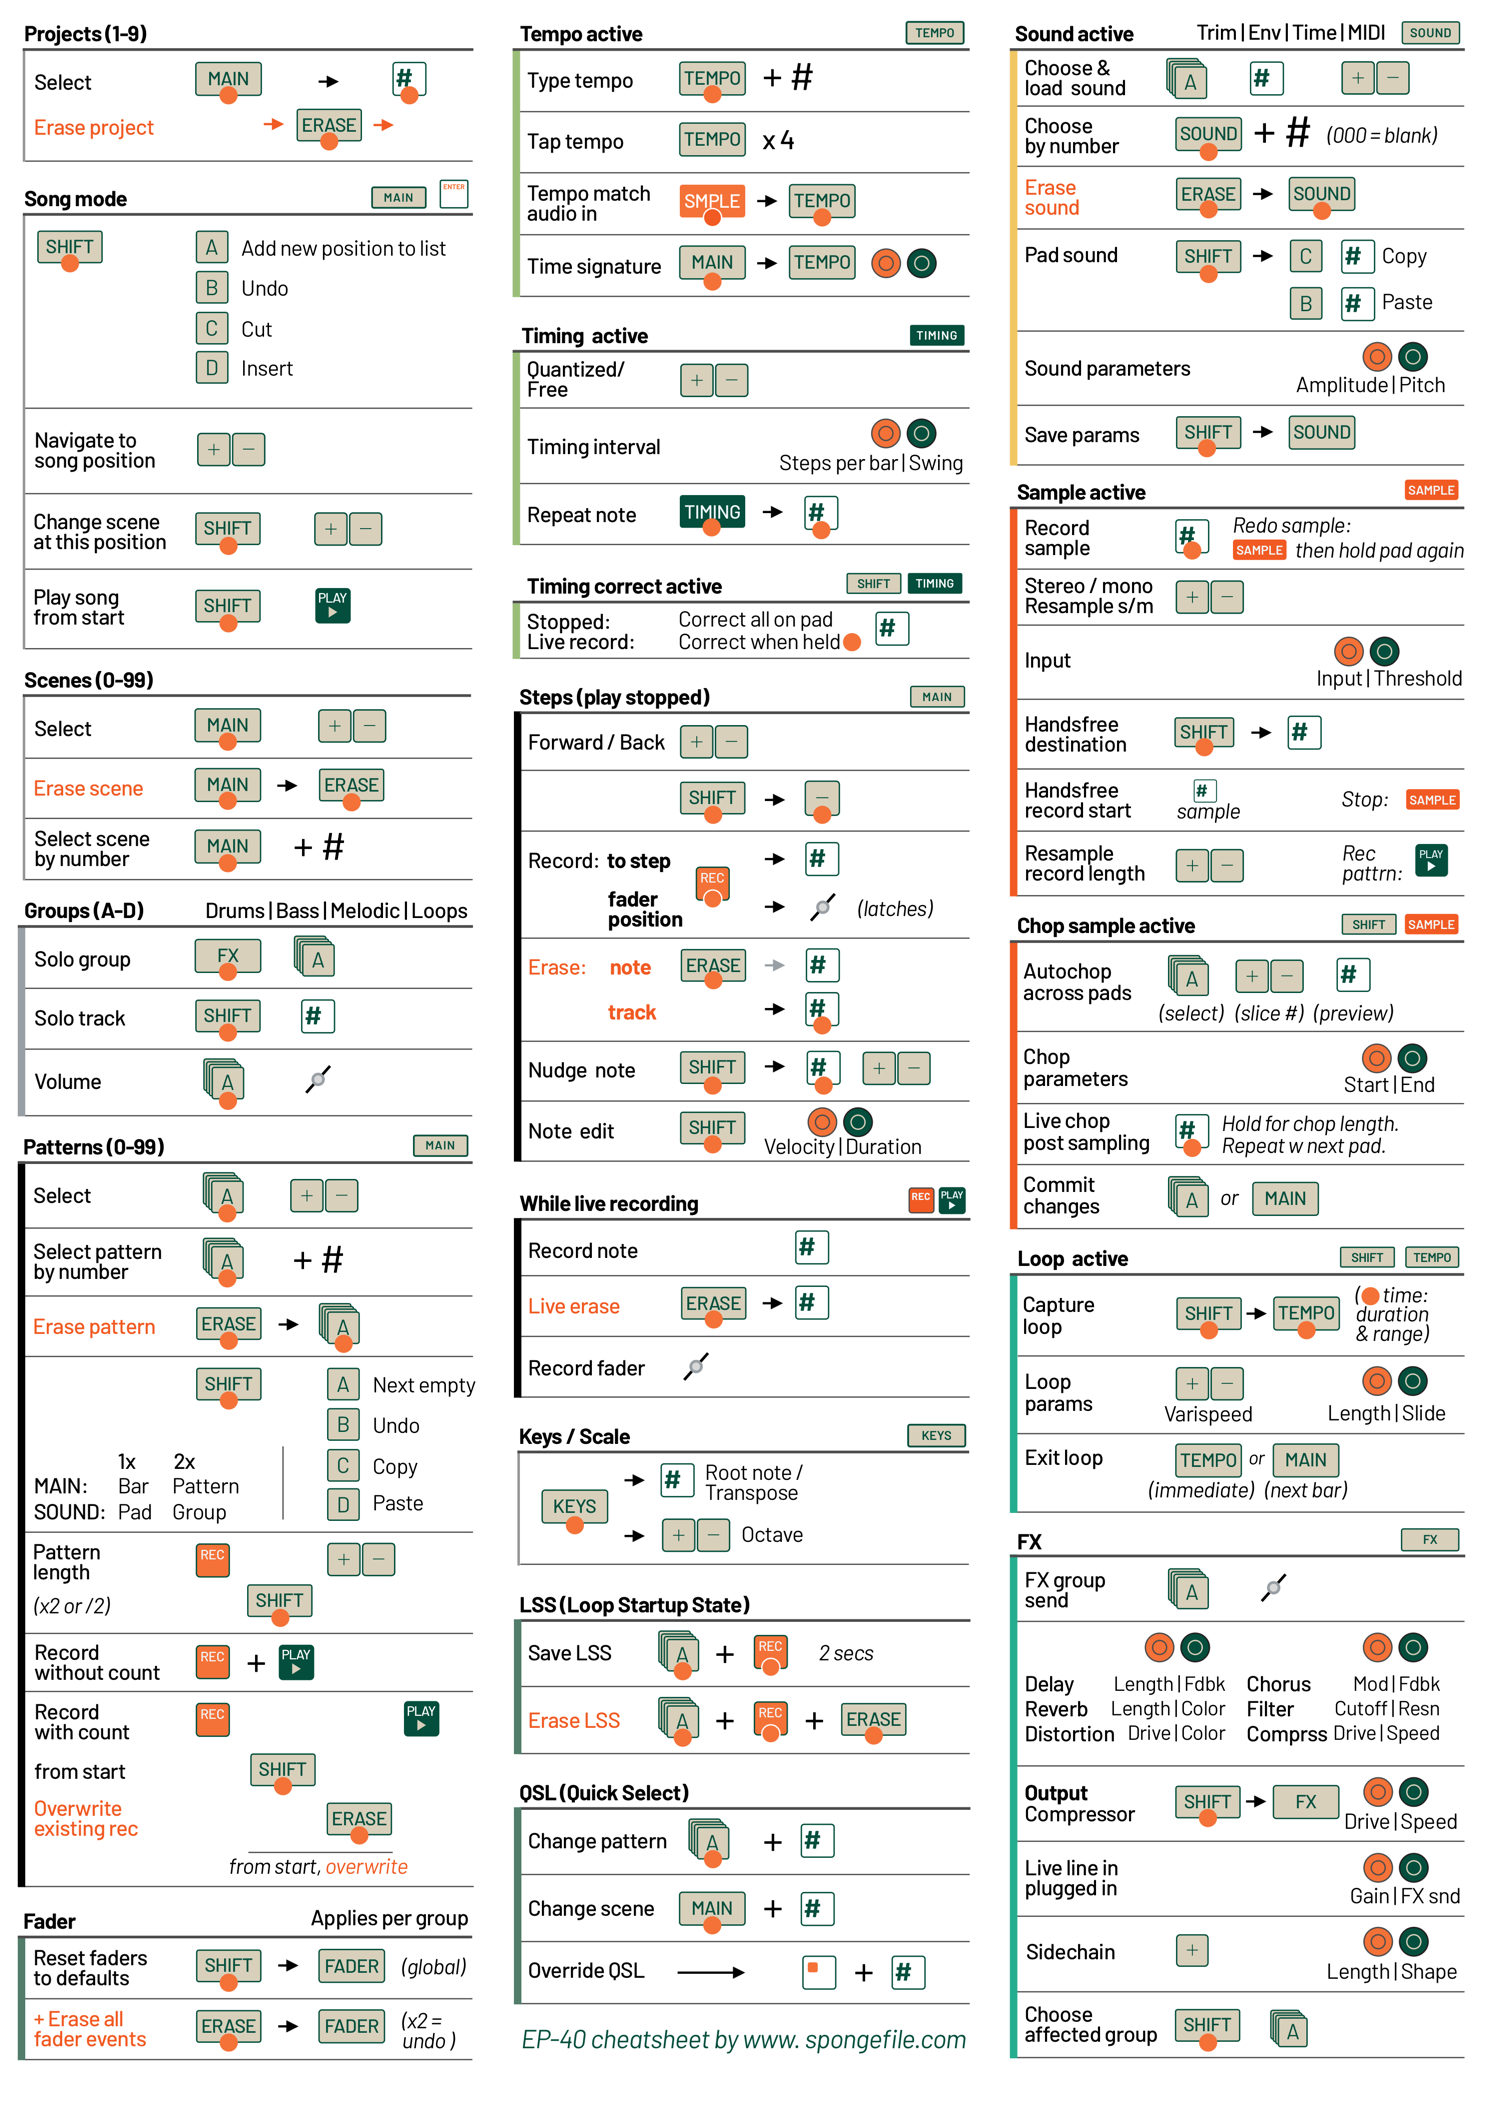
The EPs all have the same form factor, and most of the same functionality (check out my K.O. II cheat sheet for those). However, Riddim is a love letter to reggae beyond just a collection of samples in a reggae-themed container. It's specifically designed for a loop based workflow and live play in a way that the previous EPs aren't.
Before we get into that, in terms of functional graphics on the unit, the most significant change is that the group buttons don't say ABCD, but rather have icons that suggest the kind of sounds you might want to have in each. This can make it easier to remember what sounds to find where as you play live (or let a friend have a go), but do note there are also no hints as to which ones also cut/copy/paste. (Yes, I may have to make another overlay for this one as well at some point)

It also shows the key combo to enter LIVE state (SOUND + MAIN) which is your first clue as to what its creators had in mind.
Functionally, Riddim can do everything the KO II with the 2.0 Champions update can do, plus it has 128MB of space, (vs 64MB on the KOII) all of which is available for your own samples. Which means you could theoretically erase literally all the reggae sounds and replace them with whatever genre of sounds you like.
It also introduces:
- loops
- a synth engine
- live features.
In detail, these are LOP (loops), LSS (Loop Startup State), Supertone (synth engine), LIVE-state and QSL (Quick Select). Let's dig in!
LOP
EP-40 has loopable samples! You can turn any sample you like, including ones you add, into loops. In sound edit mode, where you can choose between one shot, keyboard, etc, just choose LOP. (I assume it's called LOP because LOOP won't fit on the display)
LOPs run continuously in the background, and they mute and unmute when you tap their pad, like this:
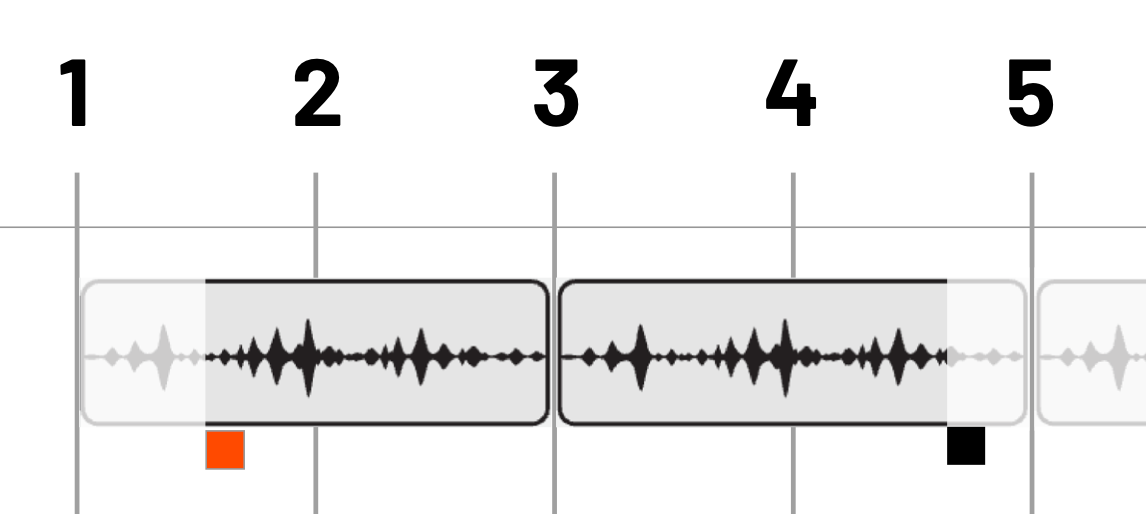
In other words, imagine that the loop is on its own track in a mixer, playing along from the start, but muted. When you want to hear it, you tap unmute on your mixer. You are not triggering a sample; you're revealing a sound that has been playing all along.
Resampling and timing
For convenience, if you resample a pattern, it automatically saves as a LOP with its BPM saved as metadata. (This makes a lot of sense when you think about it.)
If your LOPs are drifting and not keeping to the beat, that means the sample's BPM and the project's BPM aren't matching exactly. You can fix small timing errors like this by using timestretch and setting it to BPM. If the tempo difference is significant, you may get artifacts which will either be cool effects, or not at all what you want.
LOPs in mute groups
LOP pads follow mute group rules the same as other pads do, except:
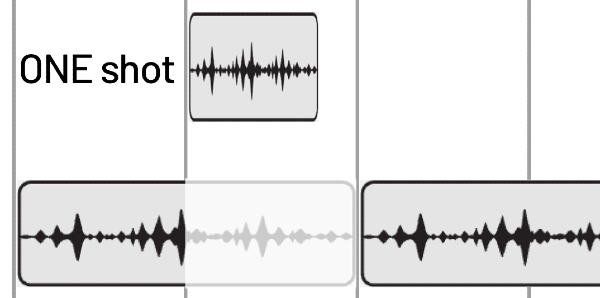
- When you trigger a ONE shot sound that is assigned to the same mute group as an unmuted LOP pad, the LOP is temporarily muted.
- The LOP pad automatically unmutes again after the ONE sound stops playing. Unmuting is synchronized to the next half-beat in order to keep it in time.
STOP mode
- press and HOLD to hear a preview of the loop from the beginning
- tap to toggle the LOP on or off (it will start either as unmuted or muted when playback starts again)
PLAY mode
- tapping the pad mutes and unmutes it (like MIDI on/off)
REC and STEP mode
- You unfortunately cannot record the LOP's mute/unmute state live or as steps. However, there's also something called LLS (Loop Startup State) that addresses this:
LSS (Loop Startup State)
This captures which LOP pads should be muted or unmuted when a pattern first loads, either via a pattern or scene change.
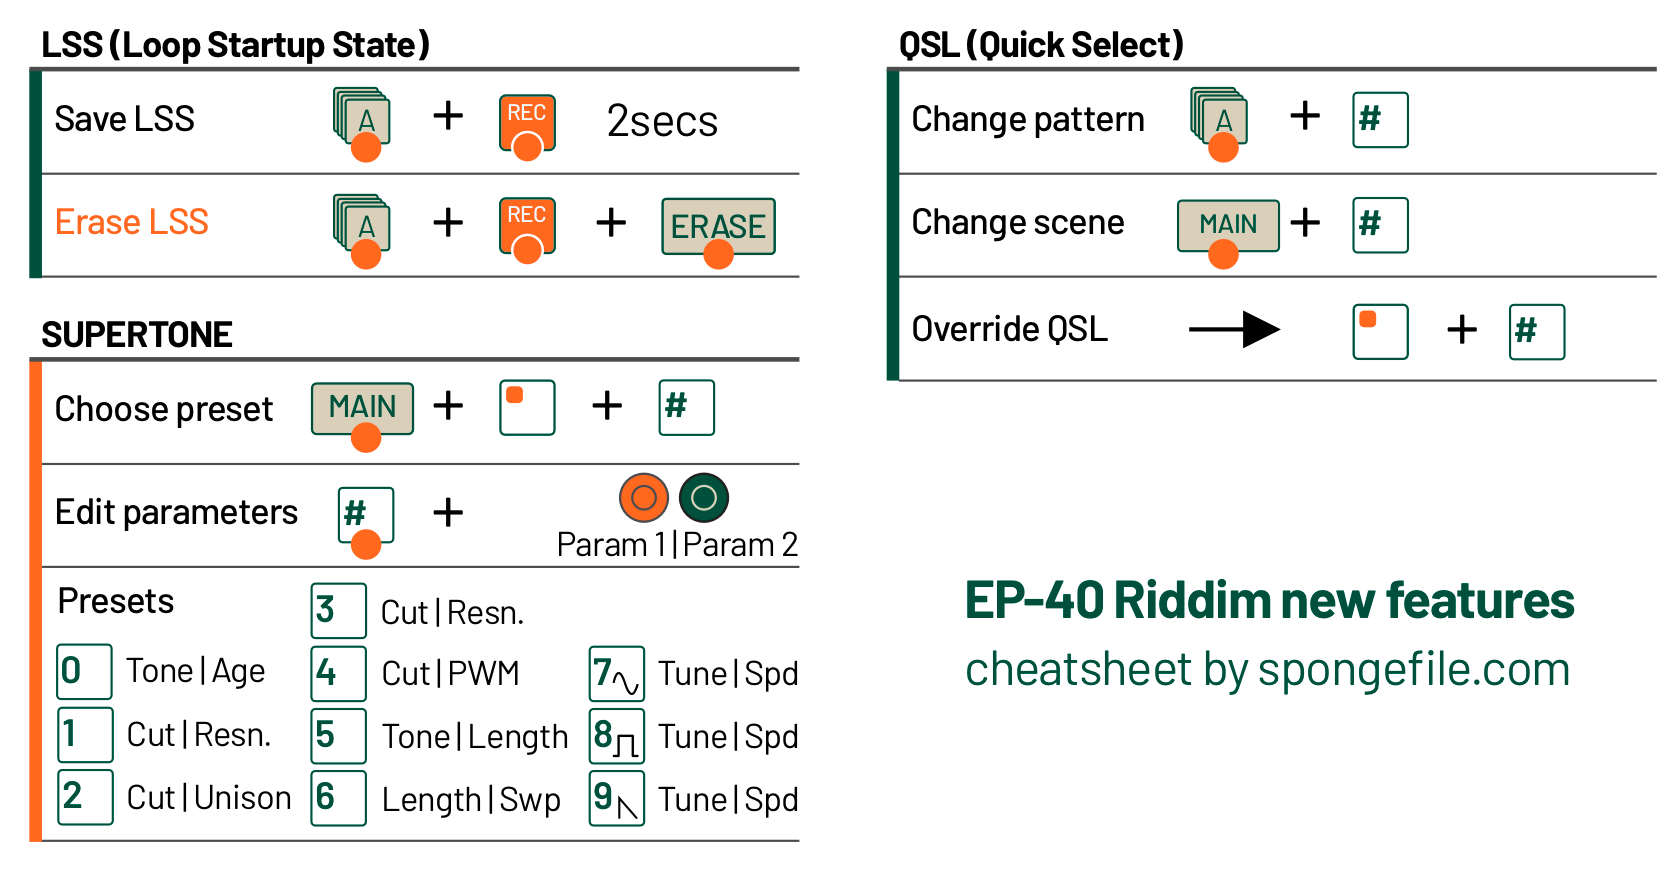
Save state: hold GROUP + REC for two seconds. Display shows LSS->SAV if you did this right.
To override this state with a new one, just set up the pads as muted or unmuted as you see fit, and save again.
Erase state: Hold GROUP + REC + ERASE for two seconds. Display shows LSS->DEL if you did this right.
LSS is also deleted if you erase the entire pattern (ERASE + GROUP pad)
MAIN mode:
If a pattern has a saved LLS, the LED of its group blinks in the following sequence:

All pads that will be unmuted by the LSS (but aren't currently unmuted or selected will also blink like this.
The LSS state only triggers once at the start of any given pattern, or any pattern (or scene) change. You can't switch a LOP's state mid-pattern; you have to make a new pattern to switch states again.
You can always override this behavior by manually muting/unmuting the pad either in STOP or PLAY mode. Also, if you manually mute/unmute before a pattern starts, this overrides the LSS once the pattern starts to play.

Sustain loops and multisamples
EP-40 has default sounds that are sustain loops, which are short samples used as sustained, tonal instruments like pads and synth tones. It also has multisamples, where a single instrument has been sampled at various different pitches. At the moment there's no official way to add your own, but fingers crossed, maybe later?
Enjoying this post? I also made a calendar app for people with ADHD.
SUPERTONE
Another brand new feature is an actual synth engine in the unit. All other EPs have been purely sample based, but this takes us back to elements of the PO series, which is a fun addition.

Presets
Access Supertone synth presets (1-9) by pressing SOUND + 🟧 + a number pad.
The synth engine has several parameters. However, only two of these parameters are available in any given instant for you to modify per preset, and the rest are set built-in, preset-specific. You can think of presets as a set of fixed settings for the synth, with two modifiable parameters exposed for each.
MAIN mode parameters
- Hold the synth pad and turn X/Y knobs to adjust synth parameters of that preset.
- SU.0 (tone/age)
- SU.1 (cutoff/resonance)
- SU.2 (cutoff/unison)
- SU.3 (cutoff/resonance) with a different filter envelope than SU.1
- SU.4 (cutoff/Pulse Width Modulation)
- SU.5 (tone/length)
- SU.6 (length/sweep)
- SU.7 (tune/speed) sine oscillator
- SU.8 (tune/speed) square octave oscillator
- SU.9 (tune/speed) sawtooth oscillator
SOUND mode parameters
- Hold the pad and turn X/Y to change AMP(amplification) and PIC(pitch)
- Hold SHIFT and press SOUND, then navigate with +/- to SUP(Supertone)
- Hold the pad and turn X/Y to adjust synth parameters
- To permanently save your changes to the preset, hold SHIFT + SOUND for 2 seconds. Display shows SAV when saved.
Note: saving a preset affects future instances of the pad, not pads which are already using the sound.
Bonus: The synth engine supports both velocity and aftertouch!
Another big difference to previous EPs is features designed for playing live:
LIVE-STATE
This is a new state the EP can be in which changes two things:
- Changing TEMPO in this mode doesn't change the project's global BPM setting. It lets you do temporary pitch up/down effects like messing around with a vinyl record. When you exit LIVE, the project goes back to its original tempo.
- You can now define which features you want to disable while playing live so you don't accidentally change something that shouldn't be changed. Disabling Record and Erase immediately come to mind as sensible options.
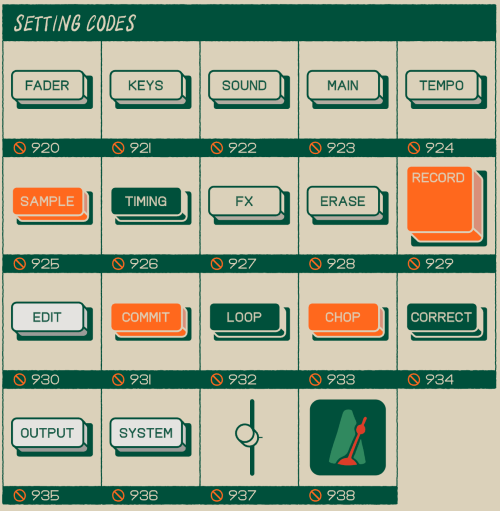
To disable/enable these live-state features, go into System settings and navigate to LIV. Or use the system codes below:
You can edit:
- Fader button (FAD) 920
- Keys (KEY) 921
- Sound (SND) 922
- Main (MAI) 923
- Tempo (TEM) 924
- Sample (SAM) 925
- Timing (TIM) 926
- FX (FX) 927
- Erase (ERA) 928
- Record (REC) 929
- Sound edit (EDT) 930
- Commit (CMT) 931
- Loop (LOP, not to be confused with the new loop functionality mentioned above) 932
- Sample chop (CHP) 933
- Timing correct (T.C.) 934
- Output effects (OUT) 935
- System settings (SYS) 936
- Fader slider (FDR) 937
- Metronome (MET) 938
Certain button combos, like SOUND + MAIN, still work even if the individual buttons are disabled. Also if you try pressing a disabled button in the LIVE-state, you'll see two blinking dots in the display.
QSL
Quick Select is another feature which should make live playing easier and more fun. Usually when you want to change a scene or pattern, you have to hold down MAIN or a group pad and then either type the number (01, or 05) or select it with +/-. This can be a bit slow and fiddly.
If you turn on QSL in Settings (SEQ > QSL), you can instead:
- Switch instantly between scenes 1-9 or patterns 1-9 by holding MAIN or GROUP and then just pressing 1-9. The change happens as soon as you've pressed the number pad.
- While MAIN or GROUP are held, you can keep fluidly changing scenes and patterns on the fly with the number pads.
Need to access a scene or pattern number greater than 9 (eg 10, or 24), or switch projects? Override QSL at any time by pressing 🟧 on the number pad first.
FX changes
- Punch-in effects 7,8,9 (stutter, octave down, bit crush) have been updated to work better with loops.
- Main FX now includes a vintage-style phaser effect.
Cheatsheet of changes
I made a cheat sheet overlay for the Riddim like the ones I've already made for the K.O. II, Medieval, and P.O. 33
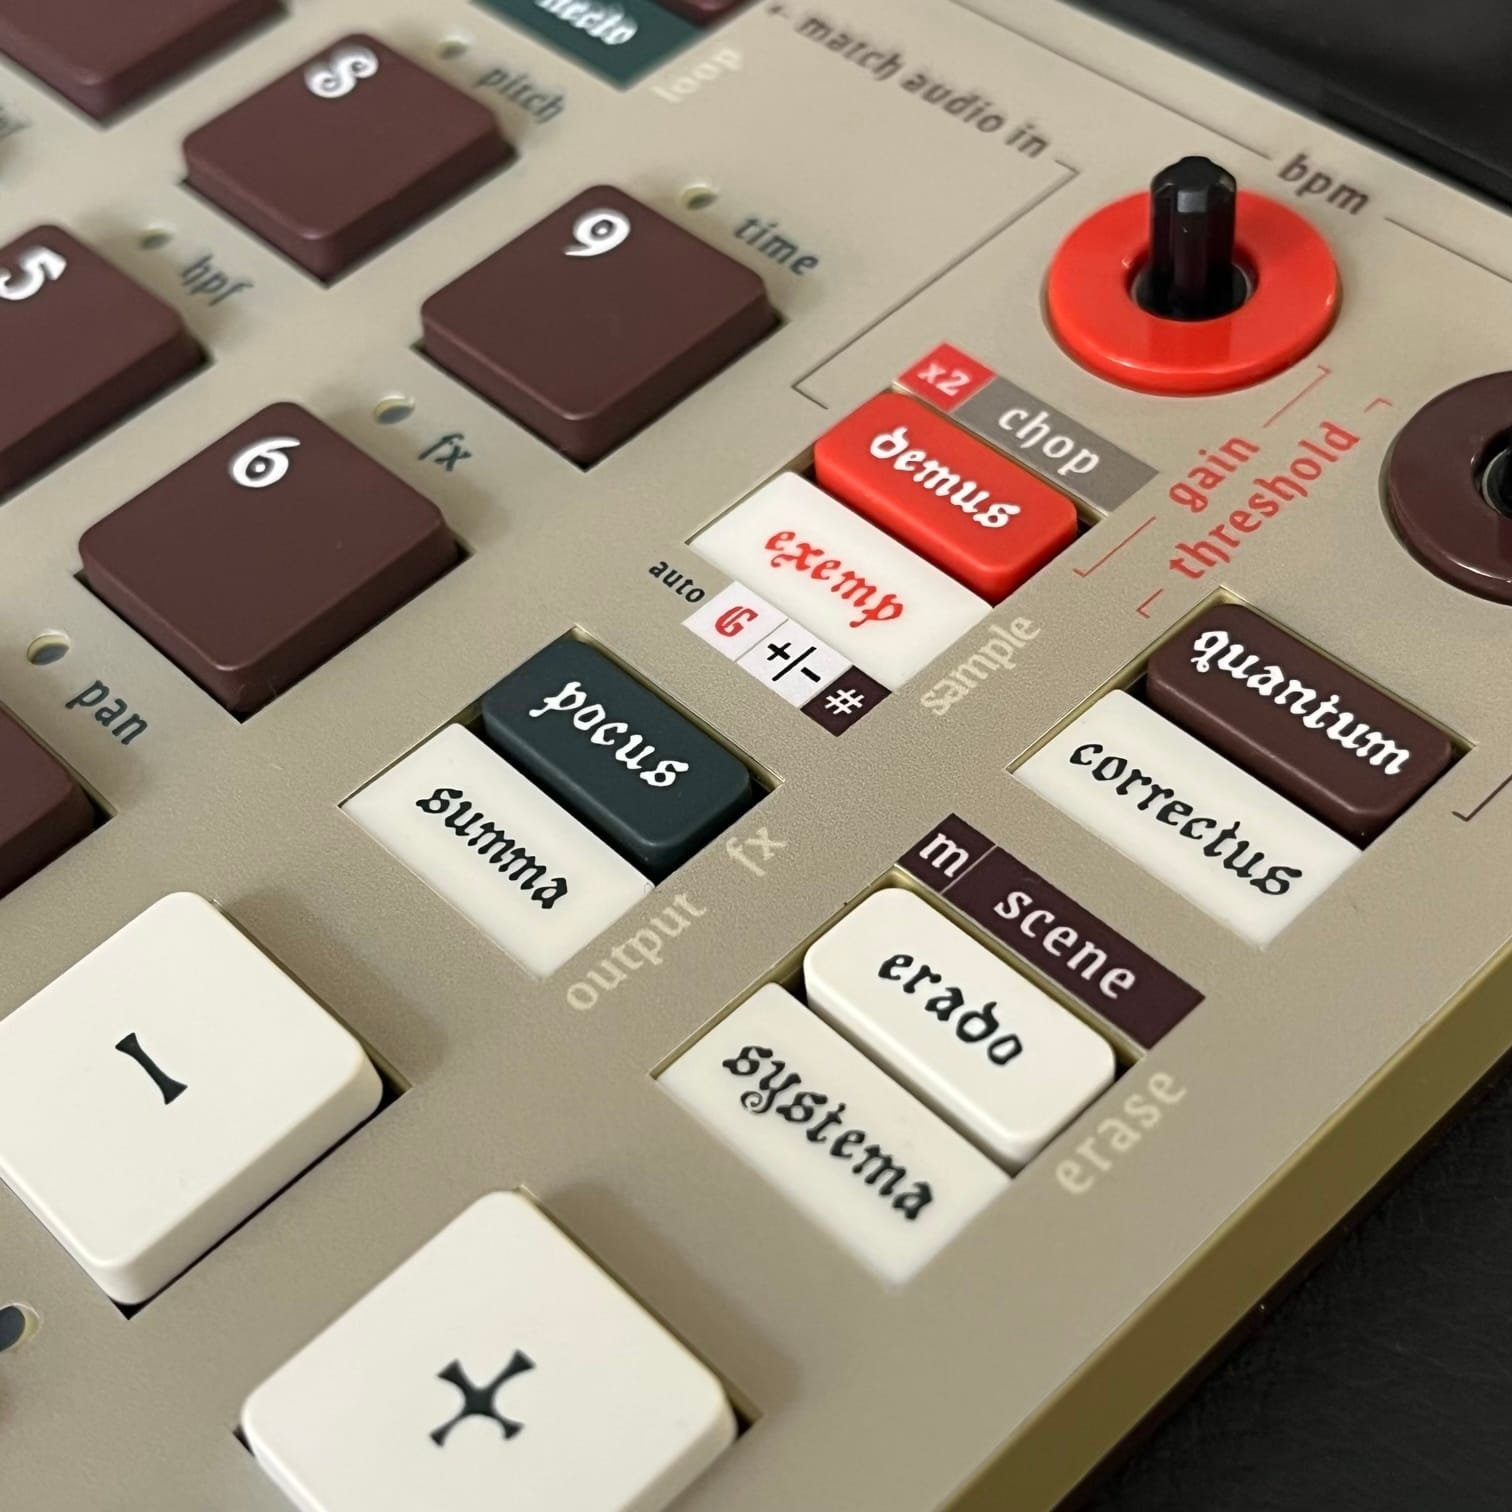

Overlays available at shop.spongefile.com
If you want to know when I do new stuff, you can subscribe to my incredibly infrequent newsletter: